It was super straight-forward! You need a t-shirt, freezer paper, a craft knife, an iron, bleach, a spray bottle and some sodium metabisulfite, also known as Campden tablets (available from home brewing shops).
Here goes:
1. Mix 50% household bleach with water in a clearly labelled spray bottle which is set to a very fine mist. I got mine for £1 from Wilko's.
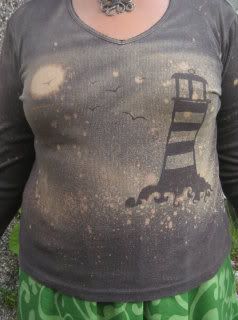
2. Draw your design on paper in a black felt tip pen. Normal stencil rules apply - those areas removed from the stencil will be the lighter bit.
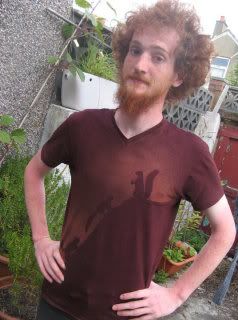
3. Place your design under the freezer paper, with the freezer paper matt side up. Using a scalpel/craft knife cut out the design, using the felt tip lines you can see as a guide. It's amazing how detailed you can be - I did whiskers on the top squirrel, then didn't on the next two because I thought they wouldn't come out, but they totally did

4. Iron your freezer paper onto the t-shirt, shiny side to the fabric. No steam on the iron. Make sure you get all the little corners stuck down well.
5. Lay your t-shirt out outside, with a piece of card/binbag or somesuch between the two layers of the t-shirt, so the bleach doesn't go through to the other side.
6. Cover every bit of the t-shirt that you really don't want to get bleach on them. It really spread out, so you need to make sure that only the area you are happy for the bleach to go on are exposed. I just used bits of card from the recycling to cover big areas.
7. Mix up a few teaspoons of sodium metabisulfite or a couple of campden tablets, in a bucket of water and have this to hand. I've seen instructions that omit this step, but I put it in because I had some to hand, and it makes sense to me that you need something to stop the bleach working. This is a safe (though stinky) chemical, which neautralises the bleach and stops it destroying the fabric over time. Theoretically

8. Spray a fine mist of bleach over the areas you wish it to go. Avoid soaking the fabric or the design, as it can go through or generally smudge at the edges. Just use a little bit of bleach and leave it longer. It will take a while to get started, but then you'll be able to see it getting lighter. It will come out looking a little lighter than you see it now, so stop it slightly before it looks right.
9. When it's ready, plunge it into the bucket of water with the sodium metabisulfite in it. I left it soak for 20 or so minutes, I couldn't find instructions to say what the optimum time was.
10. Peel off the freezer paper and run through the wash. Voila!
That looks like tonnes of instructions, but it took me less than an hour all in, including cutting the stencils.
HTH xxx


 Wow. yes please post instructions x


